

Bridle Fitting 101
Bridle fitting isn’t something we often think too hard about. Often our criteria for bridles is, “does it go on the horse’s head?” and “is the bit too high or low?” Don’t be ashamed if you’ve never put any more thought into the fit of your horse’s bridle, it’s not something we really talk about like saddle fit or bitting. Sometimes we apply weird rules that we don’t quite understand, like the “two wrinkle rule” or “four fingers under the throat latch.” Let’s take a look at how your bridle should fit and we’ll talk a little about why without launching into a full blown lecture on equine anatomy and physiology.
Let’s start with the basics, when selecting a bridle you are usually given the option of a few sizes; Pony, Cob, Full, Warmblood. There is no hard and fast industry standard for what size each piece of a bridle will be in each of these sizes, so you will need to make a judgement call on which size might fit your horse best. For instance, a 16hh thoroughbred will probably wear a full. A 17.2hh Irish Sport Horse with a roman nose might fit better in a warmblood, a 15.1hh quarter horse cross might wear a cob, and a little welsh pony is probably going to wear pony size.
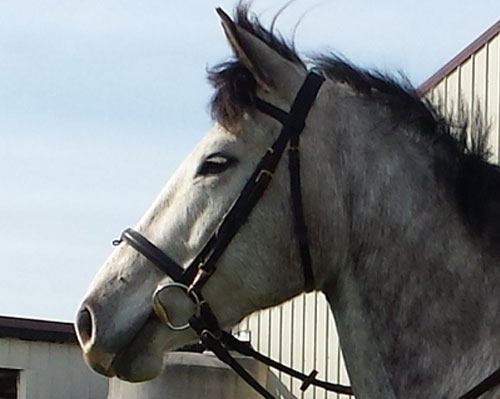
Once you have selected the bridle and size you think will fit, you should put it on your horse without a bit. Fit the bit last so you don’t have to worry about too many fitting factors at one time or the horse’s comfort. First let’s look at the splits. The splits are part of the crown of the bridle, and when fitted properly, sit just below the browband. The browband in turn should fit about ½” (or 1 finger width) below the base of the ear. If the splits do not have clearance below the browband, the throatlatch will not hang correctly nor sit flush against the horse’s face.
Speaking of browbands, the brow sits on a group of nerves and vessels, so it is important that it fits correctly. A browband which is too large can allow the bridle to slip out of place, a browband which is too small will pinch and pull the crownpiece into the base of the ears. A browband should fit so that two fingers (stacked) fit comfortably under the front of the browband.
As we already mentioned, the throatlatch should be unimpeded by the browband, allowing it to hang vertically from the split. The throatlatch helps to stabilize the bridle by preventing it from tipping side to side. This is where “four fingers under the throatlatch” comes in. You should be able to fit four fingers (stacked) between the throatlatch and the throat to ensure that the horse has enough room to flex, but not so much that the bridle is loose.
 Before we go much further there is one biology term you should learn as we’ll be referencing it a lot; this is the Zygomatic Ridge. In humans we often refer to this as the cheek bones. The zygomatic ridge protrudes from the horse’s face, and gives us an excellent landmark in terms of fitting many parts of the bridle.
Next let’s look at nosebands. We’ll start by looking at a plain noseband, also known as a plain cavesson, as many other types of nosebands are a variation on this theme. The noseband should be fit two fingers below the Zygomatic ridge. Fitting the noseband higher will put pressure directly on a nerve bundle in the horse’s face which can cause the horse discomfort. When tightening the noseband you should be able to fit two fingers (stacked) under the front of the noseband.
The cheek pieces attach to the crown and support the bit in the mouth. Now you might be thinking, “oh now it’s time for the ‘two wrinkle rule’” and you would be right; we tighten or loosen the cheek pieces to raise or lower the bit in the horse’s mouth and usually we know we’ve hit the mark when we see two wrinkles in the corner of the horse’s mouth. However, I would argue that the “two wrinkle rule” is more of a guideline than a rule. Depending on the conformation of the individual horse’s mouth, the two wrinkle rule could allow the bit to be hanging too low or too high. Ideally, the bit should sit just in front of the horse’s first molars. This placement ensures that the bit hits the correct area of the tongue – you might notice that when a bit is too low in the horse’s mouth they often play with it too much in an attempt to spit it out.
Finally let’s look at reins. The length of the reins will depend on the size of the horse, the size of the rider, and the rider’s personal preference. As a guideline, the reins should be long enough so that the horse is able to stretch on a loose rein, but also short enough that the rider’s foot could not get caught in the bite when contact is taken up. Remember when looking at reins, a rein which is too long can be shortened by a professional, a rein which is too short cannot be lengthened.
Remember when fitting all parts of the bridles which can be adjusted via a buckle that for a proper fit the strap should buckle on the middle hole. A strap that is fit on the very first or very last hole leaves little room for adjustment should the horse grow or change shape over time. This is especially important for cheek pieces, the rings of the bit your using now may not fit the same as the rings of the bit you use in the future.
One final note to remember when fitting your bridle – look at where the cheek straps and overhead straps lie in relation to the zygomatic ridge. These straps should lie behind the zygomatic ridge, this is to prevent the straps from getting too near the horse’s eyes and also to prevent irritation from rubbing along that ridge.
Wait, I use a different noseband!
Let’s take a quick look at other popular types of nosebands
Flash Nosband - A flash noseband or flash cavesson looks very similar to a plain cavesson, with the addition of a smaller strap which buckles below the bit and helps to keep the horse’s mouth closed. This type of noseband should also fit two fingers below the zygomatic ridge, but with a one finger tightness. The flash strap should have a two finger tightness when fastened.
Figure 8 or Grackle – A Figure 8 or Grackle noseband crosses in front of the nose and fastens in two places behind the jaw. The center pad where the straps cross should fit high on the nose. The top straps will cross over the zygomatic ridge before buckling behind the jaw, the lower straps will buckle below the bit, behind the chin. Each strap should have a ½” or one finger tightness between the strap and the face.
Drop Noseband – A drop noseband fits low on the horse’s nose and also aids in keeping the horse’s mouth shut. The drop should fit below the bit but above the end of the nasal bone – the ends of the nasal bone are fragile, so if you’re uncertain regarding the fit you may want to seek assistance or try a different cavesson. When tightened, you should be able to fit one finger between the noseband and the face.